
How to Groom Your Cat at Home: Everything You Need to Know
Grooming your cat at home is one of the most valuable skills you can develop as a cat owner. This complete guide covers everything from brushing and bathing to nail trimming and dental care so you can keep your cat healthy, comfortable, and looking their best without a trip to the groomer.
Why Grooming Your Cat at Home Matters
Many cat owners assume that because cats are self-groomers, professional or at-home grooming is unnecessary. This is one of the most common misconceptions in cat care. While cats do spend a significant portion of their waking hours grooming themselves, there are limits to what self-grooming can achieve. Cats cannot remove all dead fur from their coat, which leads to hairballs and matting over time. They cannot trim their own nails, clean inside their ears, or maintain their dental health. Regular at-home grooming fills these critical gaps and gives you the opportunity to catch health problems early skin conditions, lumps, parasites, dental disease, and ear infections are all detectable during a thorough grooming session. Beyond the health benefits, regular grooming builds trust and deepens the bond between you and your cat in a way that few other activities can.
How Often Should You Groom Your Cat?
The frequency of grooming depends largely on your cat’s coat type, age, and individual health needs. As a general guideline:
Short-haired cats need brushing 2-3 times per week, nail trims every 3-4 weeks, ear checks weekly, and dental brushing 2-3 times per week.
Long-haired cats need daily brushing without exception, nail trims every 2-3 weeks, ear checks twice weekly, and dental brushing 2-3 times per week.
Senior cats often need more frequent grooming assistance as they become less flexible and less able to reach all areas of their body. Older cats are also more prone to matting, dental disease, and overgrown nails.
Kittens should be introduced to grooming as early as possible even brief, gentle sessions from a young age establish positive associations that make grooming much easier throughout their entire life.
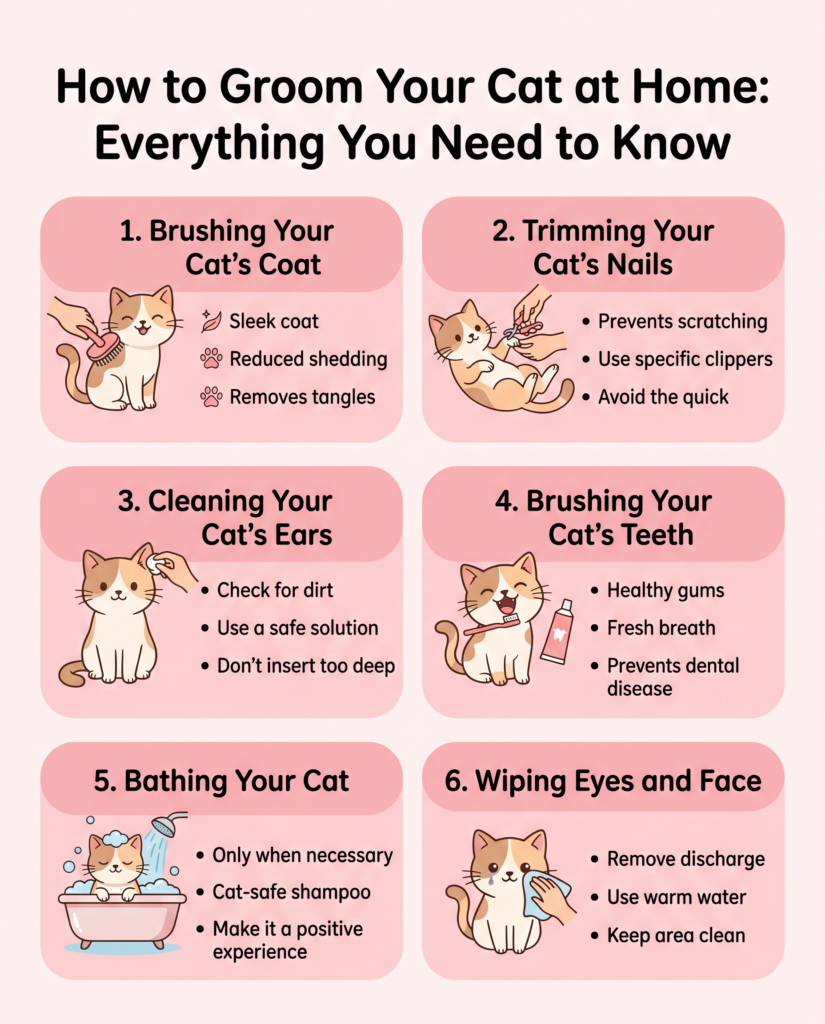
Brushing Your Cat’s Coat
Choosing the Right Brush
Selecting the correct brush for your cat’s coat type is the foundation of effective grooming. Using the wrong brush is not only ineffective it can be genuinely uncomfortable for your cat and damage the coat over time.
For short-haired cats, a rubber grooming mitt or soft bristle brush is ideal. These tools remove dead fur and distribute natural oils without putting unnecessary pressure on the skin. A fine-tooth flea comb is also useful for checking for parasites during brushing sessions.
For long-haired cats, start with a wide-tooth comb to work through any tangles before they develop into mats. Follow with a slicker brush to smooth and detangle the coat. For cats that shed heavily regardless of coat length, a deshedding tool such as the Furminator dramatically reduces the amount of loose undercoat fur.
Avoid brushes with hard, untipped metal pins these can scratch your cat’s skin and cause discomfort even if the cat doesn’t immediately react.
How to Brush Your Cat
Always brush in the direction of fur growth never against it. Start at the head and work toward the tail in smooth, gentle strokes. Pay particular attention to areas prone to matting: behind the ears, under the armpits, around the collar area, and at the base of the tail. Keep sessions short initially just two to three minutes — and gradually extend them as your cat becomes more comfortable. Always finish a brushing session with gentle praise and a treat to build positive associations.
Dealing With Mats
Mats are clumps of tangled, compacted fur that form when dead fur is not regularly removed. They are painful they pull on the skin, restrict circulation, and can hide wounds and skin infections underneath. Prevention through regular brushing is always the best approach.
If a mat does form, never attempt to cut it out with scissors. The skin beneath a mat is often much closer to the surface than it appears, and cutting injuries are extremely common. Instead, apply a cat-safe detangling spray to the mat and allow it to sit for a minute. Then use a wide-tooth comb to very gently work through the edges of the mat from the outside in, a little at a time. Hold the base of the mat firmly between your fingers and the skin while you work to prevent painful pulling.
For severe, widespread, or particularly tight matting, always consult a professional groomer or your veterinarian rather than attempting to resolve it at home.
Trimming Your Cat’s Nails
Why Nail Trimming Matters
Overgrown nails are one of the most preventable cat health problems. When nails are left untrimmed for too long, they curve and can grow directly into the paw pad, causing significant pain, infection, and in severe cases requiring veterinary intervention. Regular nail trimming also protects your furniture and prevents accidental scratches during handling.
What You Need
Use nail clippers specifically designed for cats never human nail clippers or dog clippers. Cat nail clippers come in two main styles: scissor style and guillotine style. Both work effectively; choose whichever feels most comfortable in your hand. Always have styptic powder on hand in case you accidentally cut the quick.
How to Trim Cat Nails
Choose a time when your cat is calm and relaxed after a meal is often ideal. Gently press the paw pad to extend the nail. You will see the clear outer nail and, inside it, a pink area called the quick. The quick contains blood vessels and nerves cutting into it causes pain and bleeding. Cut only the clear, sharp tip of the nail, well clear of the pink quick. If you are unsure, cut less rather than more.
If your cat is resistant, try trimming just one or two nails per session rather than all four paws at once. Offer a high-value treat immediately after each nail. With consistent positive reinforcement, most cats become significantly more tolerant of nail trimming over time.
If you accidentally cut the quick, apply styptic powder or firm pressure with a clean cloth for several minutes until the bleeding stops.
Cleaning Your Cat’s Ears
What Healthy Ears Look Like
Healthy cat ears are pale pink, clean, and completely odor-free. A small amount of light-colored wax is normal. Dark discharge, a strong or unpleasant odor, redness, swelling, or your cat frequently scratching at their ears are all signs of a potential problem ear mites, infection, or foreign bodies that require veterinary attention before any home cleaning is attempted.
How to Clean Cat Ears at Home
For routine maintenance cleaning, apply a few drops of cat-specific ear cleaning solution onto a cotton ball. Never use cotton swabs, water, or any product not specifically formulated for cat ears. Gently fold the ear flap back and wipe the visible outer surface of the ear canal in a gentle circular motion. Clean only what you can see never insert anything into the ear canal itself.
Check your cat’s ears weekly as part of your grooming routine. Early detection of problems makes treatment significantly easier and less expensive.
Brushing Your Cat’s Teeth
Why Dental Care Is Critical
Periodontal disease is one of the most prevalent health conditions in domestic cats, affecting the majority of cats over the age of three. Left untreated, dental disease causes chronic pain, tooth loss, and allows bacteria to enter the bloodstream, potentially damaging the kidneys, liver, and heart. Despite its severity, dental disease is almost entirely preventable with regular at-home care.
Getting Started With Dental Brushing
Use a toothbrush specifically designed for cats a finger brush or a small angled toothbrush — along with cat-safe enzymatic toothpaste. Never use human toothpaste, which contains fluoride and xylitol, both of which are toxic to cats.
Introduce dental care gradually. Begin by allowing your cat to lick toothpaste from your finger so they become familiar with the taste. Then introduce gentle rubbing along the gum line with your finger before introducing the brush. Start with just the front teeth and work toward the back teeth over multiple sessions.
Aim for brushing 2-3 times per week at minimum, though daily brushing is ideal. Even if your cat will only tolerate a brief session, any regular contact is beneficial. Schedule professional veterinary dental cleanings annually for thorough plaque and tartar removal under anesthesia.
Bathing Your Cat
Do Cats Need Baths?
Most cats do not require regular baths. Cats are highly efficient self-groomers and bathing too frequently strips the natural oils from the coat, leading to dry, irritated skin. Bathing is appropriate when your cat has gotten into something sticky, oily, or potentially toxic that they cannot safely clean themselves, or when treating a flea infestation in combination with other treatments.
How to Bathe a Cat
Use a shampoo specifically formulated for cats never human shampoo, dog shampoo, or dish soap. Prepare everything before bringing your cat into the bathroom. Use lukewarm water and keep the experience as brief and calm as possible. Avoid getting water in the ears, eyes, or nose. Rinse thoroughly to remove all shampoo residue. Wrap your cat immediately in a warm towel and keep them warm until completely dry.
For cats who are extremely resistant to water, waterless cat shampoos and grooming wipes are effective alternatives for between-bath freshening.
Wiping Eyes and Face
Cats particularly flat-faced breeds such as Persians, Exotic Shorthairs, and Himalayans frequently develop eye discharge that requires daily cleaning. Use a soft damp cloth, clean cotton ball, or cat-specific eye wipes to gently wipe the inner corners of each eye, moving from the inner corner outward in one gentle stroke. Always use a completely separate wipe for each eye to prevent cross-contamination. If you notice redness, cloudiness, swelling, or unusually heavy discharge, consult your vet.
Making Grooming a Positive Experience
The single most important factor in successful at-home grooming is your cat’s emotional experience of it. A cat who associates grooming with stress and discomfort will become increasingly resistant over time, making every session a battle. A cat who associates grooming with calm handling, treats, and positive attention will become progressively more cooperative.
Never attempt a grooming session when your cat is already agitated, overstimulated, or in a playful mood. Choose a calm time often after a meal. Keep early sessions very short. Use high-value treats as rewards throughout. Speak softly and move slowly. If your cat shows clear signs of stress flattened ears, a rapidly lashing tail, growling, or attempting to escape stop immediately and try again later. Never restrain your cat forcefully or continue a session over their clear objection.
Over weeks and months of consistent, positive grooming experiences, even previously resistant cats can learn to tolerate and many come to genuinely enjoy regular grooming as a form of care and connection.
When to See a Professional Groomer
Some situations are best handled by a professional groomer or veterinarian rather than at home. These include severe or widespread matting that cannot be resolved with detangling spray and a comb, cats who are extremely aggressive or distressed during grooming, long-haired breeds who require full-body clips, and any grooming need that involves areas close to sensitive structures like the eyes or genitals. A good professional groomer is a valuable partner in your cat’s overall care.
Frequently Asked Questions
How do I groom a cat that hates being touched? Start with extremely brief, positive sessions even just 30 seconds of gentle stroking. Pair every touch with high-value treats. Build tolerance slowly over weeks before introducing any grooming tools.
My cat grooms herself constantly does she still need brushing? Yes. Self-grooming cannot remove all dead fur, which leads to hairballs and potential matting. Regular brushing removes fur before it can be ingested and helps you monitor skin and coat health.
How do I know if my cat has ear mites? Ear mites typically cause dark, crumbly discharge resembling coffee grounds, along with intense scratching and head shaking. If you suspect ear mites, see your vet for diagnosis and treatment before attempting any home cleaning.
At what age should I start grooming my kitten? As early as possible ideally from the first week you bring them home. Even brief, gentle sessions from a young age establish lifelong positive associations with being handled and groomed.
Sources & Further Reading
- Cornell Feline Health Center — feline dental disease and grooming
- ASPCA cat care and grooming guidelines
- VCA Animal Hospitals — nail trimming and ear cleaning guides
- American Association of Feline Practitioners preventive healthcare guidelines
This article is for informational purposes only and does not constitute veterinary advice. Always consult a qualified veterinarian for guidance specific to your cat’s individual health needs.